
Vue3 + Vite 初级编程总结一
基础编程
安装 Nodejs
到官网下载 nodejs 并安装。版本要求:18.0+,https://nodejs.cn/。配置国内镜像
国内加速镜像
官方国内镜像:npm config set registry https://r.cnpmjs.org/
官方镜像:npm config set registry https://registry.npmjs.org/
淘宝镜像:npm config set registry https://registry.npmmirror.com/
华为云镜像:npm config set registry https://mirrors.huaweicloud.com/repository/npm/
腾讯云镜像:npm config set registry https://mirrors.cloud.tencent.com/npm/
中国科学技术大学:npm config set registry https://npmreg.proxy.ustclug.org/
网易镜像:npm config set registry https://mirrors.163.com/npm/
阿里云镜像:npm config set registry https://npm.aliyun.com/
使用基于 webpack 的 @vue/cli 创建 vue3 项目
先检查 @vue/cli 版本,确保 @vue/cli 版本必须是 4.5.0 以上。
D:\javascriptedu>vue -V
@vue/cli 5.0.8

D:\javascriptedu>vue --version
@vue/cli 5.0.8
版本不对或者未安装,需要先安装 cli。
D:\javascriptedu>npm install @vue/cli创建 vue3 项目
D:\javascriptedu>vue create vue3_test
... ...
$ cd vue3_test
$ pnpm run serve
启动 vue3 项目
D:\javascriptedu>cd vue3_test D:\javascriptedu\vue3_test>pnpm run serve ...... App running at: - Local: http://localhost:8081/ - Network: http://192.168.3.100:8081/浏览器中输入:http://localhost:8081/
使用 vite 创建 vue3 项目
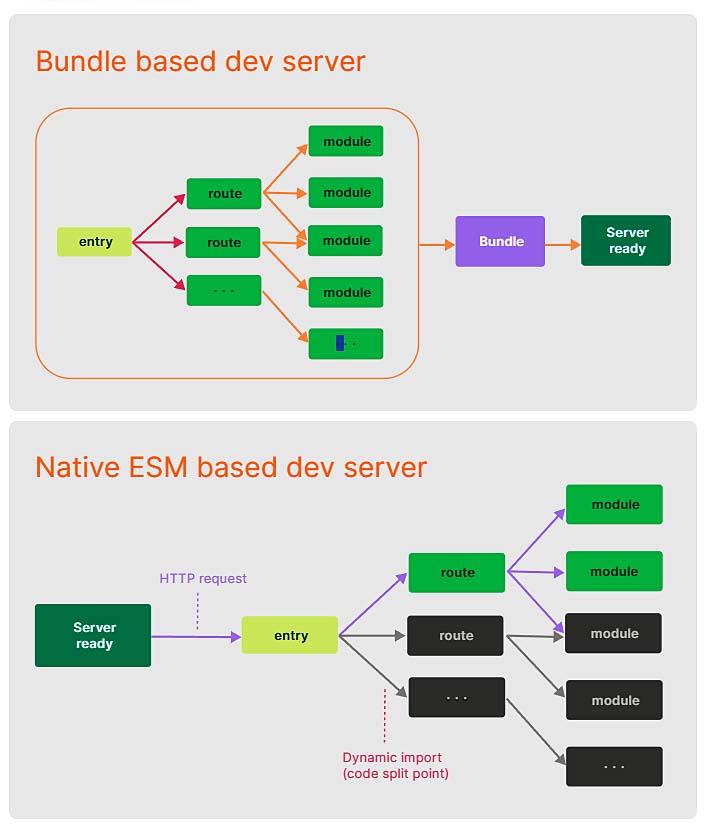
构建工具:grunt 、gulp 、webpack。这三种目前市场上最火的是 webpack 构建工具。下一代构建工具 vite 特点如下:
npm create vite@latest vue3_test_vite --template vue-ts
C:\Users\Aaron>npm create vite@latest vue3_test_vite C:\Users\Aaron>cd vue3_test_vite C:\Users\Aaron\vue3_test_vite>npm install C:\Users\Aaron\vue3_test_vite>npm run dev ➜ Local: http://localhost:5173/ ➜ Network: use --host to expose ➜ press h + enter to show help浏览器中输入:http://localhost:5173/
安装开发者工具
- chrome 网上应用店安装。可能需要梯子吧。
- 离线安装:vue3_dev_tools.crx 拖拽进浏览器扩展工具面板中并打开开关。工具下载地址:https://ai789.site/PAP/WIN/TOOLS.html
vue vue2 技术
vue2 & vue3 语法
vue2 & vue3 语法不要混合在一起写
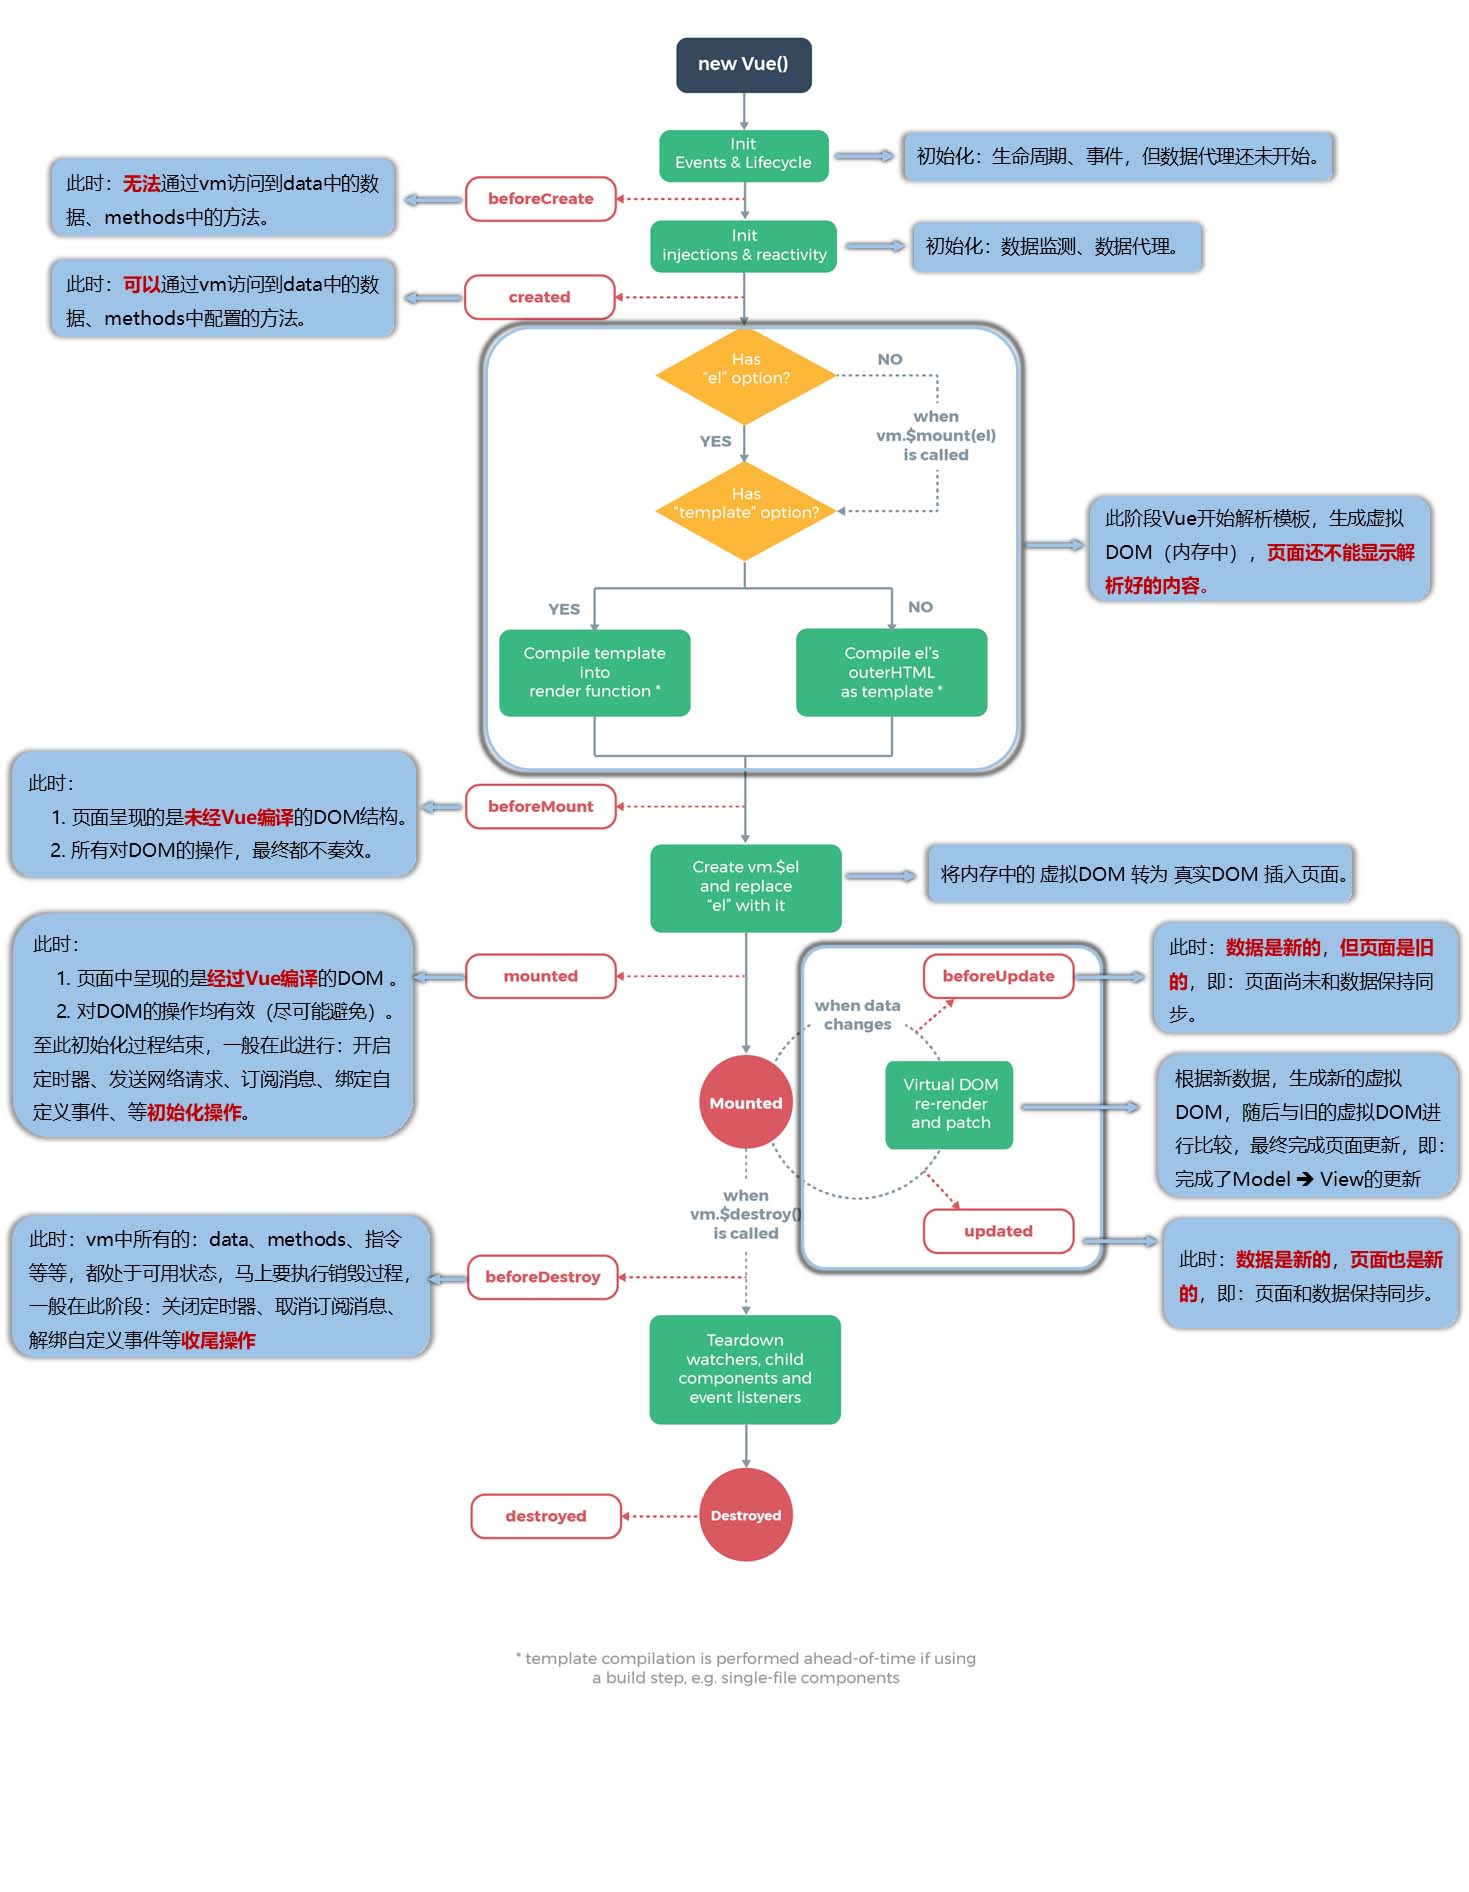
vue2 钩子生命周期
vue2 响应式原理
vue2 响应式原理
methods:{
  //新增属性
  addProperty(){
    this.$set(this.person,"sex","女")
    //或者
    Vue.(this.person,"sex","女")
  },
  //删除属性
  deleteProperty(){
    this.$delete(this.person,"name")
    //或者
    Vue.delete(this.person,"name")
  },
  //修改下标为0的数组元素值
  updateArray(){
    this.$set(this.person.hobby,0,"逛街")
    //或者
    Vue.(this.person.hobby,0,"逛街")
    //或者
    this.person.hobby.splice(0,1,"逛街")
  }
}
vue2 props 和 $attrs
vue2 props 和 $attrs
vue2 $slots 插槽
vue2 $slots 插槽
vue2 v-bind 语法
<h1 v-bind="{a:1,b:2}""></h1>
给元素绑定属性,相当于下面的写法:
<h1 a=1 b=2></h1>
简写如下:
<h1 :="{a:1,b:2}"></h1>
vue2 通信方式
vue2 通信方式
vue3 技术
vue3 钩子生命周期
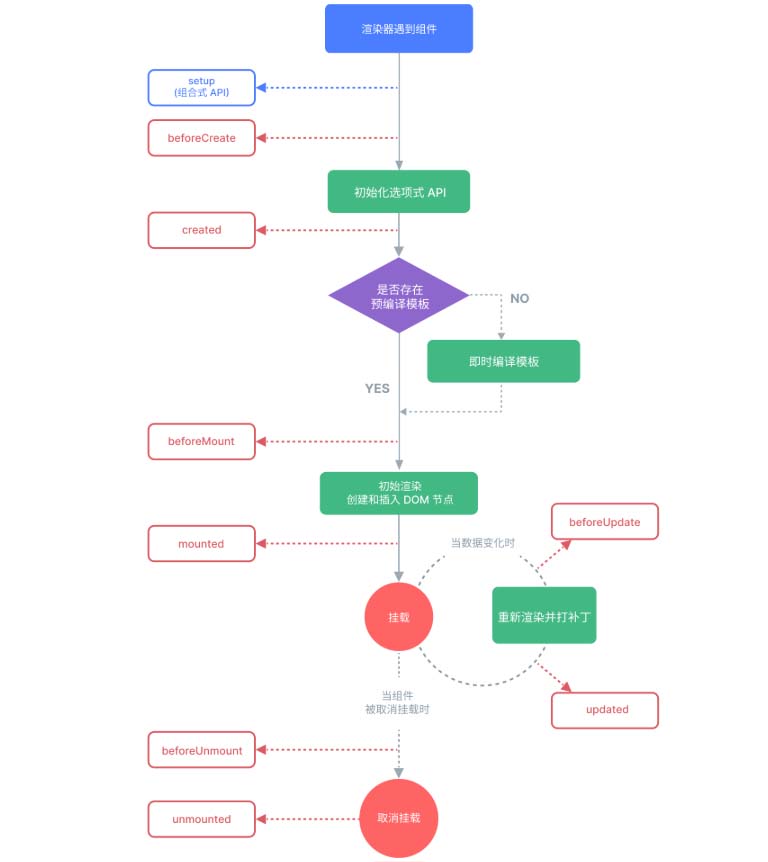
组合式生命周期钩子写法如下:
钩子函数如果重复写了多次,那么会依次执行这些函数。重复钩子可以写一些补充逻辑。
<script>
import { ref, onBeforeMount, onMounted,
onBeforeUpdate, onUpdated, onBeforeUnmount,
onUnmounted } from 'vue'

export default {
    name: 'App',
    setup() {
      console.log("---setup-等价于beforeCreate和create------")

      let sum = ref(0)

      onBeforeMount(() => {
          console.log("---onBeforeMount1-------")
      })
      onBeforeMount(() => {
          console.log("---onBeforeMount2-------")
      })
      onMounted(() => {
          console.log("---onMounted-------")
      })
      onBeforeUpdate(() => {
          console.log("---onBeforeUpdate-------")
      })
      onUpdated(() => {
          console.log("---onUpdated-------")
      })
      onBeforeUnmount(() => {
          console.log("---onBeforeUnmount-------")
      })
      onUnmounted(() => {
          console.log("---onUnmounted-------")
      })

      return {
          sum,
      }
    }
}
</script>
vue3 响应式原理
vue3 响应式原理
vue3 通信方式
vue3 通信方式
const props = defineProps({属性名:类型})const emits = defineEmits(["事件名称"]);
emits("事件名称", "传递过去的数据内容");const h1Ref = ref(null)
const comRef = ref(null)
onMounted(()=>{
console.log(h1Ref.value) //获取到dom对象
console.log(comRef.value)//获取到组件对象
})
<h1 ref="h1Ref">我是dom标签h1</h1>
<TestCom ref="comRef"></TestCom>provide("car", car) //祖组件用这句话给自己的后代组件传递数据
let car = inject('car') //后代组件用这句话接收祖组件提供的数据
还可以直接传递一个方法过去。vue3 watch 用法
watch 用法
// 监视单个 ref 简单数据类型变量
watch(sum,
      ([newSum,oldSum]) => {
      console.log(`值变化了:${newSum},${oldSum}`)
})

// 监视单个 ref 简单数据类型变量,上来立即执行一次
watch(sum,
      ([newSum,oldSum]) => {
      console.log(`值变化了:${newSum},${oldSum}`)
},{immediate:true})

// 监视多个 ref 简单数据类型变量
watch([sum, msg],
      ([newSum,newMsg], [oldSum,oldMsg]) => {
      console.log(`sum或者msg值变化了:${newSum},${newMsg},${oldSum},${oldMsg}`)
 })

// 监视多个 reactive 变量,无法正确获取oldValue
watch(person, (newValue, oldValue) => {
  console.log(`person的值变化了!`, newValue, oldValue)
}, { immediate: true, deep: true })

 // 监视 reactive 某个属性,提升性能
 watch(
  () => person.age,
  (newValue, oldValue) => {
    console.log(`person的age值变化了!`, newValue, oldValue)
 })

// 监视多个 reactive 属性,提升性能
watch([() => person.age, () => person.name], (newValue, oldValue) => {
  console.log(`person的age和name值变化了!`, newValue, oldValue)
}, { immediate: true, deep: true })

// 监视 reactive 嵌套深的属性,必须开启deep
watch([() => person.job], (newValue, oldValue) => {
  console.log(`person的job值变化了!`, newValue, oldValue)
}, { immediate: true, deep: true })

//监视 ref person 对象时的用法。需要给对象加person.value
watch(person.value, (newValue, oldValue) => {
  console.log(newValue, oldValue)
})

//监视 ref person 对象时监视用法。需要deep=true
watch(person, (newValue, oldValue) => {
  console.log(newValue, oldValue)
}, { deep: true })

// 函数里面用到的变量都会自动监视
watchEffect(() => {
    const x1 = sum.value
    const x2 = person.job.j1.salary
    console.log("watchEffect 所指定的回调执行了")
 })
vue3 插槽语法
默认插槽
<template>
    <button class="fancy-btn">
        <slot>我是插槽的默认内容,如果你们啥也不给我,我就显示默认值哦!</slot>
    </button>
</template>

<script setup lang="ts"></script>

<style scoped></style><template>
<div class="son">
<slot></slot>
</div>
</template>
<script setup lang="ts"></script>
<style scoped>
.son {
background-color: #e9a14f;
padding: 20px;
border-radius: 5px;
margin: 10px 0;
}
</style><template>
<div class="box">
<FancyButton>
<span style="color: red;">按钮啊,我是调用你的父组件,见你可怜兮兮,决定给你默认插槽传点东西尝尝~</span>
<Son>父组件把我也仍进了默认插槽,有啥办法呢。</Son>
</FancyButton>
</div>
</template>
<script setup lang="ts">
import FancyButton from './FancyButton.vue';
import Son from './Son.vue';
</script>
<style scoped>
.box {
background-color: #4fe970;
width: 400px;
height: 600px;
padding: 20px;
border-radius: 5px;
margin: 10px 0;
}
</style>具名插槽
<template>
    <header>
        <slot name="header"></slot>
    </header>
    <button class="fancy-btn">
        <slot>我是插槽的默认内容,如果你们啥也不给我,我就显示默认值哦!</slot>
    </button>
    <footer>
        <slot name="footer"></slot>
    </footer>
</template><template>
<div class="box">
<FancyButton>
<template v-slot:header>
<h2 style="color: chocolate;">我是父组件,给子组件具名插槽header传了数据,请查收!</h2>
</template>
<span style="color: red;">按钮啊,我是调用你的父组件,见你可怜兮兮,决定给你默认插槽传点东西尝尝~</span>
<Son>父组件把我也仍进了插槽,有啥办法呢。</Son>
<template v-slot:footer>
<h2 style="color:navy;">我是父组件,给子组件具名插槽footer传了数据,请查收!</h2>
</template>
</FancyButton>
</div>
</template><template>
<div class="box">
<FancyButton>
<template v-slot:header>
<h2 style="color: chocolate;">我是父组件,给子组件具名插槽header传了数据,请查收!</h2>
</template>
<template v-slot:default>
<span style="color: red;">按钮啊,我是调用你的父组件,见你可怜兮兮,决定给你默认插槽传点东西尝尝~</span>
<Son>父组件把我也仍进了插槽,有啥办法呢。</Son>
</template>
<template v-slot:footer>
<h2 style="color:navy;">我是父组件,给子组件具名插槽footer传了数据,请查收!</h2>
</template>
</FancyButton>
</div>
</template>条件插槽
<template>
    <header v-if="$slots.header">
        <slot name="header"></slot>
    </header>
    <button class="fancy-btn" v-if="$slots.default">
        <slot>我是插槽的默认内容,如果你们啥也不给我,我就显示默认值哦!</slot>
    </button>
    <footer v-if="$slots.footer">
        <slot name="footer"></slot>
    </footer>
</template><template>
<div class="box">
<FancyButton>
<template v-slot:header>
<h2 style="color: chocolate;">我是父组件,给子组件具名插槽header传了数据,请查收!</h2>
</template>
<template v-slot:footer>
<h2 style="color:navy;">我是父组件,给子组件具名插槽footer传了数据,请查收!</h2>
</template>
</FancyButton>
</div>
</template>动态插槽名:借用官方案例如下所示。
<base-layout>
  <template v-slot:[dynamicSlotName]>
    ...
  </template>

  <!-- 缩写为 -->
  <template #[dynamicSlotName]>
    ...
  </template>
</base-layout>
作用域插槽
<template>
    <div class="box">
        <FancyButton>
            ... ...
            <template v-slot="slotProps">
                收到消息:{{ slotProps.content }},收到价格:{{ slotProps.count }}元
                <br>
                <span style="color: red;">按钮啊,我是调用你的父组件,见你可怜兮兮,决定给你默认插槽传点东西尝尝~</span>
                <Son>父组件把我也仍进了插槽,有啥办法呢。</Son>
            </template>
            ... ...
        </FancyButton>
    </div>
</template><template>
<div class="box">
<FancyButton>
... ...
<template v-slot="{content,count}">
收到消息:{{ content }},收到价格:{{ count }}元
<br>
<span style="color: red;">按钮啊,我是调用你的父组件,见你可怜兮兮,决定给你默认插槽传点东西尝尝~</span>
<Son>父组件把我也仍进了插槽,有啥办法呢。</Son>
</template>
... ...
</FancyButton>
</div>
</template><template>
... ...
<button class="fancy-btn" v-if="$slots.default">
<slot :content="greetMeesage" :count="10">我是插槽的默认内容,如果你们啥也不给我,我就显示默认值哦!</slot>
</button>
... ...
</template>
<script setup lang="ts">
import { ref } from 'vue';
let greetMeesage = ref("你好啊");
</script><template>
<div class="box">
<FancyButton>
<template v-slot:header="slotNmaeProps">
收到消息:{{ slotNmaeProps.content }},收到价格:{{ slotNmaeProps.count }}元
<h2 style="color: chocolate;">我是父组件,给子组件具名插槽header传了数据,请查收!</h2>
</template>
... ...
</FancyButton>
</div>
</template><template>
<header v-if="$slots.header">
<slot name="header" :content="greetMeesage1" :count="20"></slot>
</header>
... ...
</template>
<script setup lang="ts">
... ...
let greetMeesage1 =ref("具名插槽你好啊")
</script>vue3 setup
vue3 setup
const testMessage = ref("this is test msg");
defineExpose({ testMessage });p.fullName = computed({
set(value) {
const nameArr = value.split("-");
if (nameArr.length == 2) {
p.firstName = nameArr[0];
p.lastName = nameArr[1];
}
},
get() {
return p.firstName + "-" + p.lastName;
},
});<template>
<input type="text" v-model="keyWord">
<h3>{{ keyWord }}</h3>
</template>
---------------------------------------------------------
<script>
import { ref, customRef } from 'vue'
export default {
name: 'App',
setup() {
//let keyWord = ref('hello')//使用 vue 提供的 ref 来实现实时动态更新功能
function myRef(value,delay) {
let timer
console.log("自定义的myRef", value)
return customRef((track, trigger) => {
return {
get() {
console.log("有人从myRef中读取数据了", value)
track() //通知 vue 追踪 value
return value
},
set(newValue) {
console.log("有人改数据了", newValue)
value = newValue
clearTimeout(timer)
timer = setTimeout(() => {
trigger() //通知 vue 重新解析模板
}, delay);
}
}
})
}
let keyWord = myRef('hello',500)//使用自定义的 ref 来实现实时动态更新功能
return {
keyWord,
}
}
}
</script>
<style>
#app {
font-family: Avenir, Helvetica, Arial, sans-serif;
-webkit-font-smoothing: antialiased;
-moz-osx-font-smoothing: grayscale;
text-align: center;
color: #2c3e50;
margin-top: 60px;
}
</style><script>
import { ref, reactive, toRefs, readonly, isRef,
isReactive, isReadonly, isProxy } from 'vue';
export default {
name: 'App',
setup() {
let car = reactive({
name: "奔驰",
price: 40
})
let sum = ref(0)
let car2 = readonly(car)
console.log(isRef(sum))
console.log(isReactive(car))
console.log(isReadonly(car2))
console.log(isProxy(car))
console.log(isProxy(car2))
return {
...toRefs(car)
}
}
}
</script><template>
<div>
<button @click="isShow = true">点我谈个窗</button>
<Teleport to="body">
<div class="mask" v-if="isShow">
<div class="dialouge">
<h3>我是一个弹窗</h3>
<h4>一些数据内容呢</h4>
<h4>一些数据内容呢</h4>
<h4>一些数据内容呢</h4>
<button @click="isShow = false">关闭弹窗</button>
</div>
</div>
</Teleport>
</div>
</template>father 组件(父组件)
<script>
import { defineAsyncComponent } from 'vue';//静态引入
const Child = defineAsyncComponent(() => { //异步引入
  return import("./components/Child.vue")
})

export default {
  name: 'App',
  components: { Child },
}
</script>
--------------------------------------------------
<template>
  <div class="app">
    <h3>我是APP组件</h3>
    <Suspense>
      <template v-slot:default>
        <Child />
      </template>
      <template v-slot:fallback>
        <h3>稍等,加载中... ...</h3>
      </template>
    </Suspense>
  </div>
</template>
child 组件(子组件)
<template>
  <div class="child">
      <h3>我是child组件</h3>
      {{ sum }}
  </div>
</template>

<script>
import { ref } from 'vue'

export default {
    name: 'Child-c',
    async setup() {
        let sum = ref(0)
        let p = new Promise((resolve, reject) => {
            setTimeout(() => {
                resolve({ sum })
            }, 5000);
        })

        return await p
    }
}
</script>
组合式 API 优势
使用传统的配置项 API,新增或者修改一个需求,就需要分别在 data、methods、computed 等钩子里修改。组合式 API 可以更加优雅的组织我们的代码、函数。让相关功能更加有序的组织在一起。
项目开发工具
vue 全家桶
- vue
- vue-router:路由
- pinia:状态管理
- vuex:管理状态
- mint-ui:ui 组件库
- element-plus:UI 组件库
- vue-lazyload:图片懒加载
- vue-scroller:滚动库
- better-scroll:滚动、滑动库
- swiper:图片轮播
- moment:日期
- date-fns:日期,库更小
- miit:事件总线
前后台交互
- postman:接口测试
- mockjs:数据模拟
- axios:ajax 请求
模块化
- es6
- babel
- typescript
项目构建工程化
- webpack:创建结构化
- vite:构建工具
- vue-cli:创建项目脚手架
- eslint:语法检测
css 预编译器
- stylus:css 编译器
- less:
数据可视化
- echarts:数据可视化开源库
- canvas:画布
- svg:矢量图
pinia 用法
pinia 之于 vue3 就像 vuex 之于 vue2 一样重要。它们主要充当状态管理的角色。所谓状态管理,简单来说就是一个存储数据的地方,存放在 pinia 中的数据在各个组件中都能访问到,它是 vue 生态中重要的组成部分,它是 Vue 的存储库,它允许您跨组件/页面共享状态。
主要优点
使用 pinia
npm install pinia// main.ts
import { createApp } from "vue";
import "./style.css";
import App from "./App.vue";
import { createPinia } from "pinia";
const pinia = createPinia();
const app = createApp(App);
app.use(pinia);
app.mount("#app");// /src/store/user.ts
import { defineStore } from "pinia";
// name:一个字符串,必传项,该store的唯一id。
// options:一个对象,store的配置项,比如配置store内的数据,修改数据的方法等等
export const useUsersStore = defineStore("users", {
// 其它配置项
});// /src/App.vue
<script setup lang="ts">
import {useUsersStore} from './store/user'; const store = useUsersStore();
console.log(store);
</script>// 修改/src/store/user.ts文件如下
import { defineStore } from "pinia";
// name:一个字符串,必传项,该store的唯一id。
// options:一个对象,store的配置项,比如配置store内的数据,修改数据的方法等等
export const useUsersStore = defineStore("users", {
// 给内部添加数据
// 需要注意的是,state接收的是一个箭头函数返回的值,它不能直接接收一个对象。
state: () => {
return {
name: "小明",
age: 25,
sex: "男",
};
},
});// /src/App.vue <script setup lang="ts"> import { useUsersStore } from './store/user'; //import { ref } from 'vue'; const store = useUsersStore(); console.log(store); //const name = ref<string>(store.name) //const age = ref<number>(store.age) //const sex = ref<string>(store.sex) const {name,age,sex} = store </script> <template> <div> <img src="./assets/vue.svg" class="logo vue" alt="Vue logo" /> <p>姓名:{{ name }}</p> <p>年龄:{{ age }}</p> <p>性别:{{ sex }}</p> </div> </template>// /src/App.vue import { storeToRefs } from "pinia"; const store = useUsersStore(); const { name, age, sex } = storeToRefs(store);// /src/App.vue <button @click="reset">重置</button> const reset = () => { store.$reset(); }// /src/App.vue <button @click="patchModifyData">批量修改数据</button> const patchModifyData = () => { store.$patch({ name: "李四", age: 20, sex: "女" }) }// /src/store/user.ts import { defineStore } from "pinia"; // name:一个字符串,必传项,该store的唯一id。 // options:一个对象,store的配置项,比如配置store内的数据,修改数据的方法等等 export const useUsersStore = defineStore('users', { // 给内部添加数据 // 需要注意的是,state接收的是一个箭头函数返回的值,它不能直接接收一个对象。 state: () => { return { name: "小明", age: 25, sex: "男", }; }, getters: { getAddAge: (state) => { return state.age + 100; }, }, }) // /src/App.vue <p>新年龄:{{ store.getAddAge }}</p>// /src/store/user.ts import { defineStore } from "pinia"; // name:一个字符串,必传项,该store的唯一id。 // options:一个对象,store的配置项,比如配置store内的数据,修改数据的方法等等 export const useUsersStore = defineStore('users', { // 给内部添加数据 // 需要注意的是,state接收的是一个箭头函数返回的值,它不能直接接收一个对象。 state: () => { return { name: "小明", age: 25, sex: "男", }; }, getters: { getAddAge: (state) => { return state.age + 100; }, getNameAndAge(): string { return this.name + this.getAddAge; // 调用其它getter }, }, }) // /src/App.vue <p>调用其它getter:{{ store.getNameAndAge }}</p>// /src/store/user.ts import { defineStore } from "pinia"; // name:一个字符串,必传项,该store的唯一id。 // options:一个对象,store的配置项,比如配置store内的数据,修改数据的方法等等 export const useUsersStore = defineStore('users', { // 给内部添加数据 // 需要注意的是,state接收的是一个箭头函数返回的值,它不能直接接收一个对象。 state: () => { return { name: "小明", age: 25, sex: "男", }; }, getters: { getAddAge: (state) => { return state.age + 100; }, getAddAge1: (state) => { return (num: number) => state.age + num; }, getNameAndAge(): string { return this.name + this.getAddAge; // 调用其它getter }, }, }) // /src/App.vue <p>调用其它getter:{{ store.getAddAge1(741852) }}</p>
//  /src/store/user.ts

import { defineStore } from "pinia";

// name:一个字符串,必传项,该store的唯一id。
// options:一个对象,store的配置项,比如配置store内的数据,修改数据的方法等等
export const useUsersStore = defineStore('users', {
    // 给内部添加数据
    // 需要注意的是,state接收的是一个箭头函数返回的值,它不能直接接收一个对象。
    state: () => {
        return {
            name: "小明",
            age: 25,
            sex: "男",
        };
    },
    getters: {
        getAddAge: (state) => {
            return state.age + 100;
        },
        getAddAge1: (state) => {
            return (num: number) => state.age + num;
        },
        getNameAndAge(): string {
            return this.name + this.getAddAge; // 调用其它getter
        },
    },
    actions: {
        saveName(name: string) {
          this.name = name;
        },
    },
})

// /src/App.vue
<button @click="saveName">保存姓名</button>

const saveName = () => {
    store.name = "王五";
}